Git really does include some strange names, commands, and terminology, and certain words crop up regularly whose meaning is not obvious. In this post, I’ll explain as clearly as possible what ORIGIN is in Git, and how to ‘git check origin‘ to find the url of the remote. I’ll also explain some related commands such as git remote add origin to set the remote origin (git set origin), and how to change the remote origin, and change the remote url.
Once you’ve created your local repo and done a bit of coding you will probably want to share your code with other team members. At that point you need to push your code to a remote repo, which you need to create. So I’ll also explain how to do that to get you started.
Table of contents
What is a remote repository anyway?
A remote repository (or repo, for short) is an online store for your local code, an online, cloud-based version of your code. Once you push your files from your local repo to your remote repo it means there is a copy of them in a remote location.
So if you change your local files, the remote ones won’t change until you ‘commit’ your local changes and ‘push’ them to the remote repo. You need to set up an account with github / gitlab / Bitbucket which are some of the many hosts of remote repositories.
The remote repo can then be cloned by others so they can also contribute to the code in the repo.
Create the remote repo in github
Before you can do anything else you need to make sure the remote url exists in your github account, and for that to be the case you need to create a new repository. This screenshot shows what it looks like when you create a new repo in github.
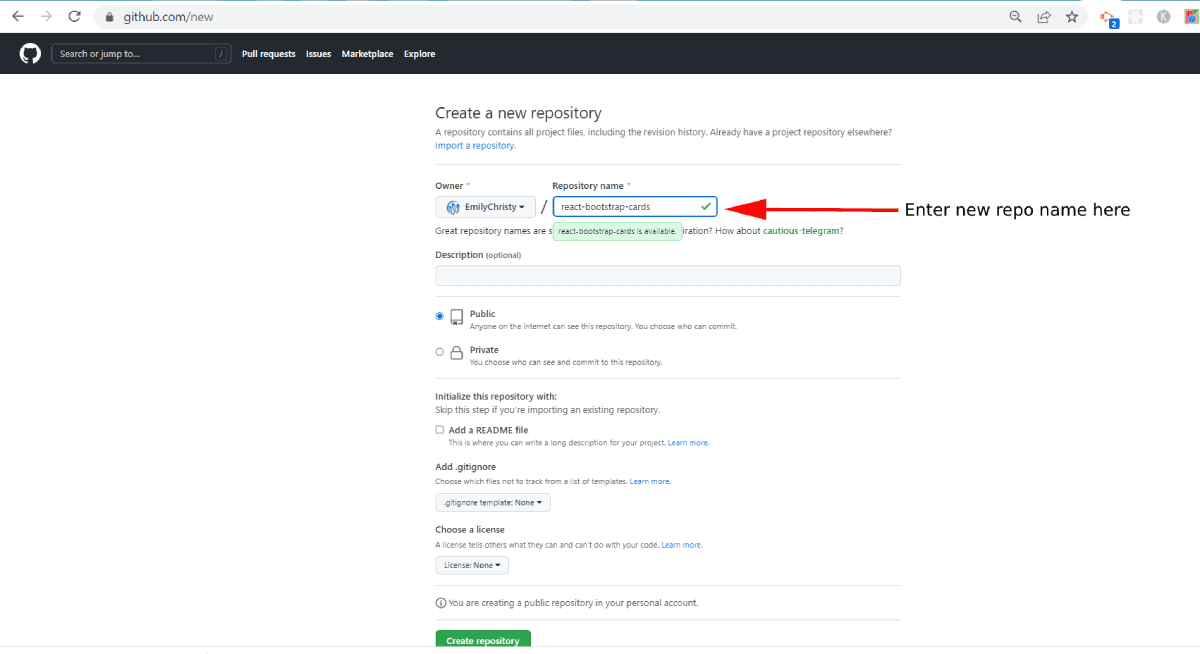
Once created, the repository has a unique url – the url of this remote repository that I’ve created is:
https://github.com/EmilyChristy/react-bootstrap-cardsIn this case, EmilyChristy is the name of the git repo. You should replace this with the name of your repo.
One repository can have multiple ‘remotes’ – although most generally you will only have one. However, it’s good to know how to add and remove a git remote. Git is case sensitive so it is fairly easy to accidentally create multiple remotes.
If you were to run the command git remote add origin and then command git remote add ORIGIN you will have two new remotes, one called origin and one called ORIGIN!
So what is ORIGIN in git?
ORIGIN is just a shorthand name for the url of a remote repository.
When you initially clone a repository using the git clone command, it automatically creates a remote connection called ORIGIN pointing back to the cloned repository. So if you don’t tell it what you want your remote to be called, then it will call it ORIGIN by default.
If you haven’t deliberately changed anything about the remote – or if you have no idea what that even means, then you can presume that you have one remote and that it’s called ORIGIN.
ORIGIN is presumed
When you start out using git it can feel as if the only time you see mention of ORIGIN is when you see an error. It’s important to understand that in many git commands, certain details are presumed. In many cases, you don’t have to specify ORIGIN because it’s presumed that it’s the name of your remote. In that case, all of these commands do exactly the same thing :
git fetch ORIGIN
git fetch https://remote.repo.url
git fetch
So when you type :
git fetch… the ORIGIN part is presumed. If you had renamed your remote to MYREMOTE then you would have to type:
git fetch MYREMOTESet the remote repository using git remote add
You use the git remote add command when there is not already a remote with the name specified. If there is already a remote with the name specified, you will get an error when you use the git remote add command. In this case, you will need git set-url as described below. There are 2 arguments to the git remote add command:
- A remote name, for example,
ORIGIN - A remote URL, for example,
https://github.com/user/repo.git
So to set the ORIGIN in git, the full command would be:
git remote add ORIGIN https://github.com/user/repo.gitThis connects the local repo to a remote repo at the address specified. Once you’ve done this you can push your changes from the local repo to the remote.
Working with remotes – add / remove / details
Check the remote servers (or find git origin)
If you don’t know what the name of your remote is then you can use this command to check :
git remoteYou will then see the remote name of any servers.
Note: If you have problems when using git push, read this post which explains what to do about the message “git fatal: The current branch has no upstream branch”
git check origin – find the name and url of the remote server
To find the url of ORIGIN, or in other words to git show remote url, use:
git remote -vChange the remote url using git remote set-url
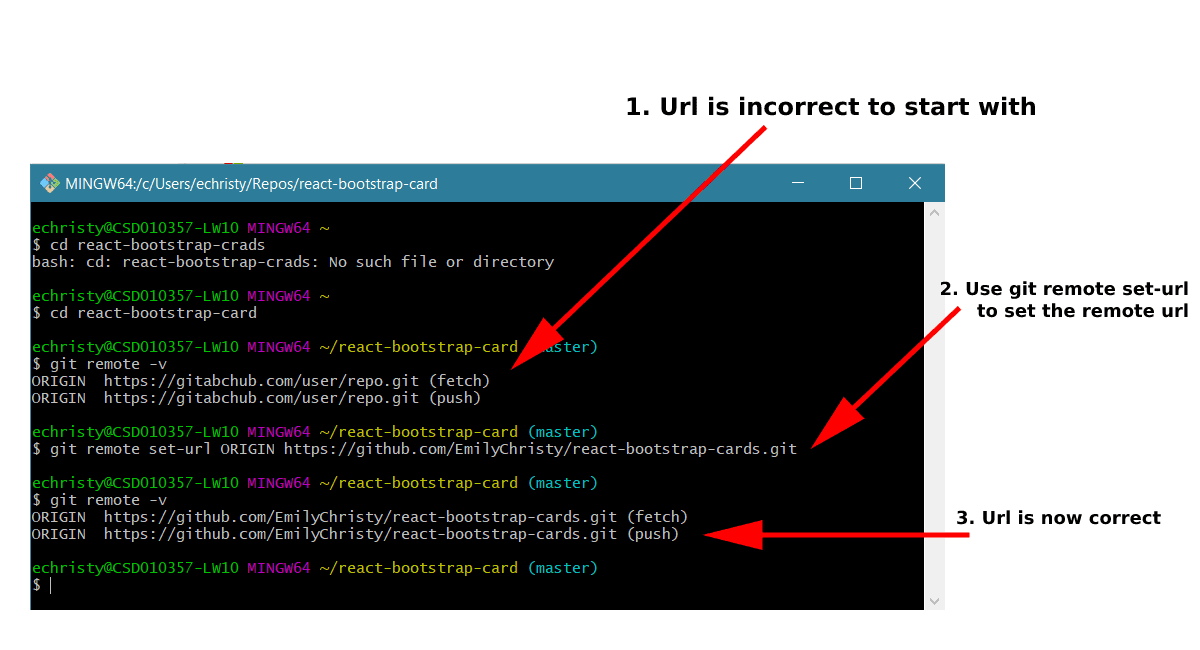
Use the git remote set-url command to change the url of the remote git repo – or ‘git change remote origin’. Similar to the git remote add command, git remote set-url takes 2 commands:
- An existing remote name. For example,
originormyremote - A new URL for the remote. For example https://github.com/USERNAME/REPOSITORY.git
So the command to change the remote URL in git looks like this:
git remote set-url ORIGIN https://github.com/your-git-name-here/react-bootstrap-cards.gitIf you are looking for how to ‘git change remote origin’ then this is the command you are looking for.
I’ve written another post that explains how to git remote remove.
View remote details using git remote show
To find details about a remote you can use this command:
git remote show ORIGIN … where ORIGIN is the name of the remote. It gives a great overview of the remote specified – you see the remote url, which is the default branch, and a list of tracked remote branches, remote branches which need to be pruned, and local branches.
FAQS
Use the git remote -v command
You set git ORIGIN by using the git remote add command like this:git remote add ORIGIN https://github.com/user/repo.git
To find the default branch name in your remote (ORIGIN) you can use:git remote show ORIGIN