This is a follow up to my previous post ‘What is git? Explained in plain English‘. In that post I explain what git is, what a git repository is, what a branch is, and how to create a remote repo. In this post I’ll cover the following topics:
- how to use git commit to save your changes
- how to use git to push to a remote branch
- describe some typical git workflows
- talk about how to use and manage branches
- using git log and git status to find information about your repo and branches
- how to clone a remote repository
How to use git commit to save your changes
So you’ve been coding, and building your website or app. Once you’ve made changes in a few files you might want to ‘commit‘ those changes. Think of a commit as a way of grouping changes and of providing a snapshot, a marker if you like, of all your project files at that moment. The ‘commit‘ will be given a unique reference so if you wanted to rollback to this point at a later time, you can. When you commit any changes you add a comment to that commit which you can use to describe the changes you’ve made. Such as:
– “Added new product pages“
– “Fixed the sign up bug”
– “Please, please work!”
If you’re working as part of a team, you may need to add a bug ticket reference here too.
– “PROJ001-747A added new signup form”
You will need to type:
git commit -a -m "Your commit message goes here"
The -m tells git to use the message in the quotes against this commit.
The -a tells git to automatically stage all un-committed files to this commit. Huh? What’s staging?!
What is git stage?
Actually git stage isn’t a real command but it’s often what people look for because we talk about ‘staging‘ files sometimes before we commit our changes. Let’s say the team you’re working on doesn’t want everyone to push their changes to the remote repo all the time. In that case you may want to do lots of commits through your work day and then one push at the end of the day. But if you’ve worked on 3 different features you don’t really want to put all of these in one commit with only one commit message. You will want to ‘stage‘ your changes, i.e. break it all down into ‘stages‘. There is some logic to the terminology I guess?! On the command line you stage your changes by typing:
git add .
It would so much clearer if this was git stage rather than git add, but there you go! Now that you know how to use git add and git commit to finalise your changes you may also at some point need to know how to undo git commit!
How to git push to a remote branch
Once you’ve finished your work you’ll want to ‘push your changes‘. This means you’re going to send your changes from your local repo to your remote repo, or to put it another way you will transfer your commits from your local repo to the remote repo.
Why do we do this? Once your code is in the remote repo it will be accessible by anyone else with permission to access it, so if you’re working on a team you’ll need to do this before they can see, or use, what you’ve coded. Even if you’re working on your own, pushing to a remote branch means you have a remote backup of your code. Remember you can’t push your changes until you’ve committed them.
So how do we know which branch we will be pushing to? Your local branch will have an upstream branch set (I think of this as a branch which is paired with my local branch). If it doesn’t have an upstream branch then when you push you’ll get a message saying “fatal: The current branch yourbranchname has no upstream branch.” so you’ll have to set the upstream branch when you push, like this:
git push --set-upstream origin yourbranchname
If you already have an upstream branch set, which is the case most of the time, you can just type:
git push
If all goes well you’ll see some percentages and some messages from git about the files that have been pushed successfully. Your remote upstream branch will now contain all of your commits.
How to use and manage git branches
Each time you set a repo up it makes sense to name your branches consistently so that your workflow becomes second nature from project to project. I always have my main branch as main, my central development branch as, you’ve guessed it, develop.
Let’s say you are working as part of a team of 3 developers and you’re all working on the codebase at the same time. You’ll have your current production code in main (actually you probably won’t, it tends to be in a versioned branch but for simplicity’s sake for now lets just say here that it’s called main!).
You’ll start by creating your develop branch from main. That is, you’ll tell git you want it to create a new branch called develop from your existing main branch, main. To start with check that you are currently on the main branch by typing:
git status
If you are on the main branch already then you’ll see a message saying :
on branch main
If you aren’t then switch to branch main by typing:
git checkout main
And now you can create your new branch, and switch to the new branch, by typing:
git branch develop
git checkout develop
You could do that in one line by typing:
git checkout -b develop
Either way, you have now created a central development branch.
Using feature branches
Now developer 1 needs to create a branch that they can work on without effecting anyone else for a while, so they create a new branch from develop and call it devname-feature. They then checkout that branch and do all of their work locally in that branch, pushing their changes regularly to the remote branch without having to worry about what anyone else is doing.
So how would you do this using git commands?
git checkout main
git branch devname-feature
git checkout devname-feature
Line by line that means:
|—> switch to the branch that’s called ‘main‘
|—> create a new branch called ‘devname-feature‘
|—> switch to branch ‘ devname-feature‘
git commit -m "built new feature abc"
git push
Line by line that means:
|—> commit your code changes to the local repo with the message ‘built feature 123’
|—> push local changes to the remote repo
At the same time developer 2 needs to create a branch for the same reasons so they create a new branch from develop and call it devname-myfeature or feature-ref456.
They then checkout that branch and do all of their work locally in that branch, pushing their changes regularly to the remote branch without having to worry about what anyone else is doing. Sound familiar?!
At the same time developer 3 needs to create a branch…. ok you get the picture now.
Read this post to find out how to delete a local branch, or this one to learn how to rename a git branch.
Using git log to see all your commits
Git log shows you a list of commits made to your repository, including the comment against the commit, the commit author, and the commit SHA hash id – it’s a really easy way of finding the SHA id of a commit, which you may need to if you want to undo back to a certain commit. In it;s simplest form, to see a list of your commits type:
git log
If you want a really simple list of your commits type:
git log --oneline
Using git status to understand your branch
Git status is super useful – it will never change anything, so you can’t cause any problems by using this command! It will tell you the current state of your working directory.
It will tell you if you have any changed files that are uncommitted and which branch you are on. It will show you a list of your staged changes. If your local branch has an upstream branch then it will also tell you if you are ahead or behind the upstream branch. If you are ahead then you will need to push your changes to the remote branch. If you are behind, then it means someone else has pushed their changes to the remote branch and you need to pull them down to your local branch. It can also be really useful to understand what’s happening if you have a merge conflict and need to resolve it.
How to clone a remote git repository
Click the green code button from the repo page in GitHub. There are different ways to clone, using SSH, https, or Github CLI.
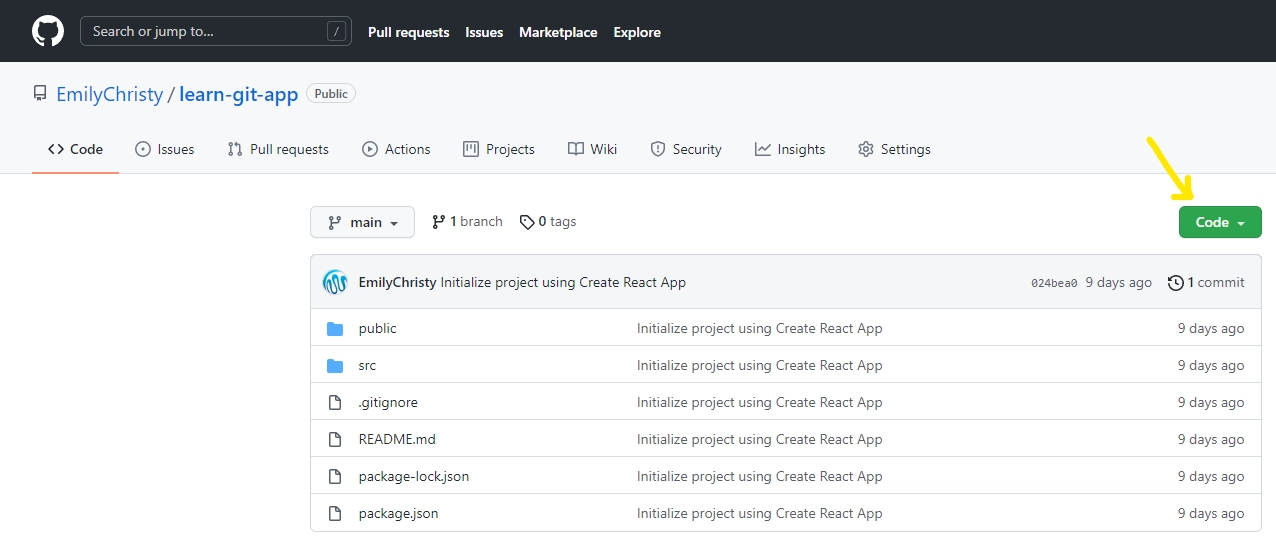
I’ll use https here, so make sure you have that selected from the popup and copy the path that should start with https://. Then use the git clone command, so type this:
git clone https://github.com/yourNameHere/repoNameHere
Once it’s been cloned that repo is now set up on your local machine and you can get working. Once you’ve made some changes you will commit them, and push them to the remote branch, just as I described before.
A typical git workflow
The way you use Git can vary depending on the team you’re working in, both in terms of the number of people using the repo, and in terms of preference. I’ve typically found that each software team has a slightly different process, so just take this as a typical example.
You are most likely when working as part of a team to need to clone a remote repo to get started, rather than creating a repo locally and then setting everything up. So presuming the remote repo is ready to go, and that your github account has access to it, you will need to clone a git repo to get started.
Then you will do some work and commit your changes by using git add to stage these changes, and git commit to confirm the change.
Then you will push your changes to the remote branch by using git push. If others on your team have added work you’ll need to get these changes by using git pull, or you may wish to use git fetch first. Read about the difference between git pull and git fetch.
In conclusion
So after reading both of my ‘Git in Plain English’ posts you know how to create a repo, connect a local repo to a remote repo, and clone a git repo. You also can now commit your changes, and push to a remote branch. And finally you have some idea of how to use branches to use git a typical way.
There is an awful lot of capability in git and I’d recommend now learning about using git rebase, and git stash. As always when using git, proceed with care before running any commands!