Further to my first post explaining how to use Bootstrap with React Forms, this post will show you how to add validation to your Bootstrap React form, and show any errors when the form is submitted. Intentionally this is kept as straightforward as possible and without using any additional packages, so that you can learn the most basic way to build and handle a Bootstrap form in React (using Hooks). I’ve also kept all the code in one file – once you’ve built this React Bootstrap form example, you may want to refactor this code and separate it into a reusable Form component but I think it’s useful to see all the code in one place to get an initial understanding of how each part works.
Table of contents
React Bootstrap form example – breaking it down
Breaking this down into steps we will need to:
– Update the form fields to ‘useState’
– Check and validate the data that has been entered
– If there are problems with the data – stop the submission and display error messages
– If the data is OK – handle the onClick event of the submit button and submit the form
We’ll start by simplifying the form from part 1 so that we are left with only 2 form fields – name and email. Here is the starting code for the form. This has two fields and a submit button but if you click the submit button in this starting code it won’t do anything. Step by step we will add each part of the code needed to turn it into a fully functioning form.
import React, { useState } from "react";
import "bootstrap/dist/css/bootstrap.min.css";

import Container from "react-bootstrap/Container";
import Row from "react-bootstrap/Row";
import Col from "react-bootstrap/Col";
import Button from "react-bootstrap/Button";
import Form from "react-bootstrap/Form";
import Alert from "react-bootstrap/Alert";

import "./App.css";

function App() {
  const [showMessage, setShowMessage] = useState(false);

  return (
    <div className="App">
      <header className="App-header">
        <p>
          React Bootstrap <code>Form Example</code>.
        </p>
      </header>
      <Container className="p-3">
        <Container>
          <Row>
            <Col>
              <Alert show={showMessage} variant="success">
                <Alert.Heading>Success</Alert.Heading>
                <p>
                  Thanks for the message!
                </p>
                <hr />
                <div className="d-flex justify-content-end">
                  <Button
                    onClick={() => setShowMessage(false)}
                    variant="outline-success"
                  >
                    Close this alert
                  </Button>
                </div>
              </Alert>
            </Col>
          </Row>
          <Row>
            <Col></Col>
            <Col>
              <Form>
                <Form.Group controlId="formGridName">
                  <Form.Label>Name</Form.Label>
                  <Form.Control
                    placeholder="Full Name"
                    type="text"
                    name="fullname"
                  />
                </Form.Group>
                <Form.Row>
                  <Form.Group as={Col} controlId="formGridEmail">
                    <Form.Label>Email</Form.Label>
                    <Form.Control
                      placeholder="Enter email"
                      type="email"
                      name="email"
                    />
                  </Form.Group>
                </Form.Row>
                <Button type="submit" variant="primary" size="lg">
                  Submit
                </Button>
              </Form>
            </Col>
            <Col></Col>
          </Row>
        </Container>
      </Container>
    </div>
  );
}

export default App;
Preserving form field values
First of all we will define a state variable called ‘values’. This will hold the value for each form field and will preserve it between function calls. To define it, and initialise each value within it, type this:
const [values, setValues] = useState({
    fullname: "",
    email: "",
  });
This defines two items within the values object called fullname and email, and sets each to have a starting value of an empty string. Then we’ll define another state variable to hold the all the error information for each field – this is defining an empty object:
const [formerrors, setFormErrors] = useState({});
Next we need to make some changes to each form field so that we can start to use the form fields to set the data, so add type, name, and value properties to each of the form fields as follows, along with assigning a method called handleChange to the ‘onChange’ property of each form field:
 <Form.Control
  placeholder="Full Name"
  type="text"
  name="fullname"
  value={values.fullname}
  onChange={handleChange}
  />

  <Form.Control
   placeholder="Enter email"
   type="email"
   name="email"
   value={values.email}
   onChange={handleChange}
   />
And now we add the code for the handleChange method:
const handleChange = (event) => {
   //this console.log message should be removed once you've tested the event works
   console.log(
      "handleChange -> " + event.target.name + " : " + event.target.value
    );
  	//this is the important bit
    setValues((values) => ({
      ...values,
      [event.target.name]: event.target.value,
    }));
  };
I like to use console.log messages to understand what’s happening when I’m learning something new. If you run the code once you’ve added that handler you’ll see the handleChange event fire every time you perform a keypress, something like this, where in the Developer tools console window you see the message develop:
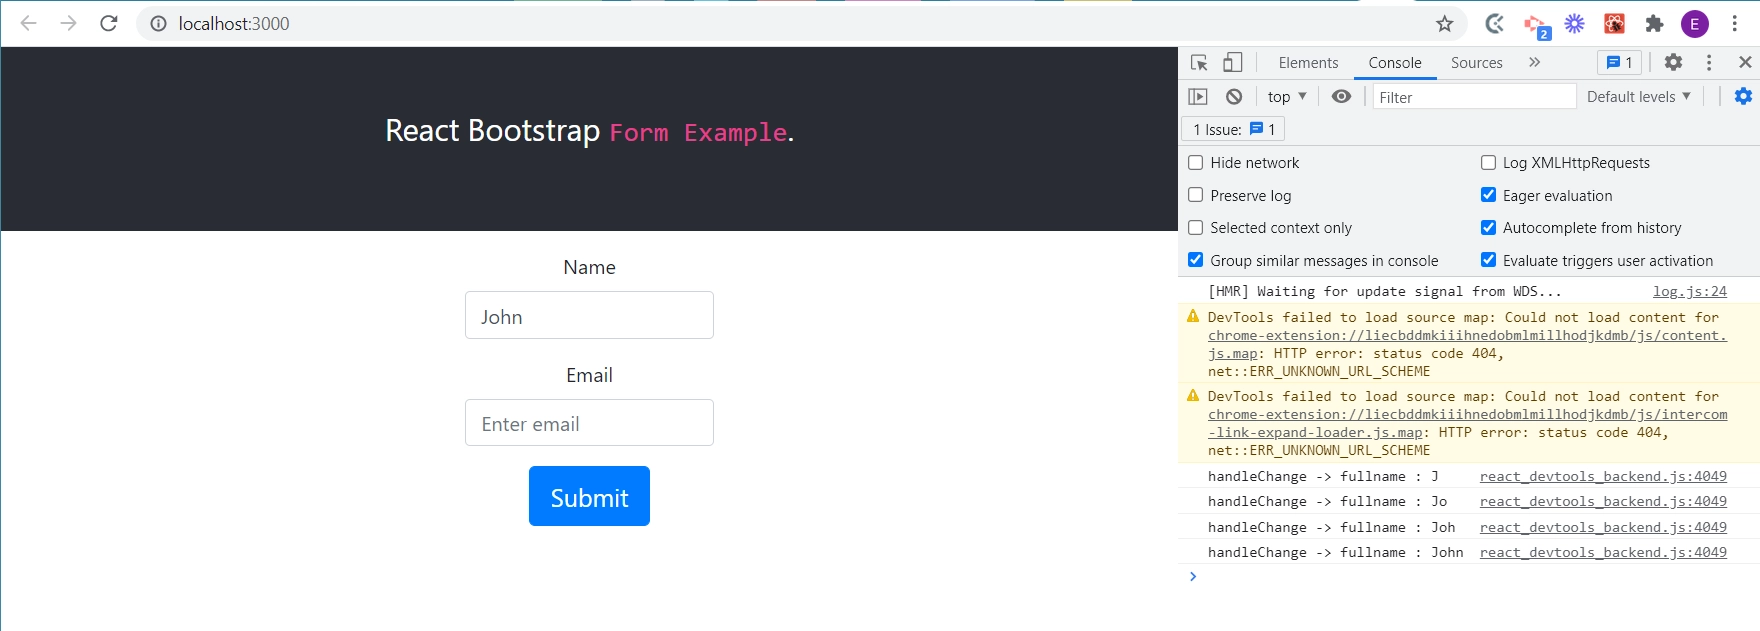
The main bit of code in the handle change event is updating the values object, by setting a property called ‘fullname’ and updating it’s value on every keystroke.
Check and validate Bootstrap React form data
Now we need to check the data that’s been entered into the form, so we’ll add a method called validateForm to our code like this, just after the handleSubmit method:
const validateForm = () => {
  //
}
Next update the validate method so that it checks each form field according to rules that you will write. So for the email field we want to make sure that it is not empty and also that it is formatted according to standard email address rules. The name field we just want to check that it’s not empty. If any of these conditions are not met then we will populate the errors object with a message for the relevant field. When I’m building a form I also like to add a console.log message to each method before I fill it with code, just to check that the right methods are being called at the right time. These log messages show up in the Console window of the Chrome Developer tools. Here is the code for the validate function:
  const validate = () => {
    console.log("Validate the form....");

    let errors = {};

    //name field
    if (!values.fullname) {
      errors.fullname = "Full name is required";
    }

    //email field
    if (!values.email) {
      errors.email = "Email address is required";
    } else if (!/\S+@\S+\.\S+/.test(values.email)) {
      errors.email = "Email address is invalid";
    }

    setFormErrors(errors);

    if (Object.keys(errors).length === 0) {
      return true;
    } else {
      return false;
    }
  };
Display the error messages
If there are problems with any of the data we want to show the user what is wrong. And prefereably we want to show each error message against the form it relates to. So we add a small paragraph under each field which will only show up if there is an error for that field. Like this:
<Form.Control
  placeholder="Full Name"
  type="text"
  name="fullname"
  value={values.fullname}
  onChange={handleChange}
  required
/>
//error message - if formerrors.name contains a value, then show this message
{formerrors.fullname && (
  <p className="text-danger">{formerrors.fullname}</p>
 )}
If you run this now and test it, you’ll see the error message but it will just look like normal text. So we need to add a class to our markup to style the error messages. Bootstrap has some predefined colour classes which help convey meaning.
….. and now it will be red. Now change ‘text-danger‘ to ‘text-warning‘ and you’ll see it’s orange. All the colour utility classes are defined here.
React form submit – handling the event
We’ll add a function to handle the onClick event of the Submit button next. First of all add the method, and call it handleSubmit.
const handleSubmit = () => {
   if (event) event.preventDefault();

    if (validate(values)) {
      setShowMessage(true);
    } else {
      setShowMessage(false);
    }
  }
This prevents the initial form reload, then calls the validate function, which returns a ‘true’ or a ‘false’. If it validates ok, and returns a true, then we call setShowMessage(true) which updates the showMessage value to ‘true’ and therefore displays the green success Bootstrap alert message.
And then we need to tell the Form to use this method when the Submit button is clicked, and to do this we have to modify the Form opening tag so that it looks like this:
<Form onSubmit={handleSubmit}>
We also need to specify that the Submit button is of the type Submit, in order for it to trigger the event to submit the Bootstrap React form. So change the button definition to this:
  <Button
  	type="submit"
  	variant="primary"
  	size="lg">
    Submit
  </Button>
Save your changes, and now using the Chrome Developer Tools put a breakpoint in the App.js file in the handleSubmit method. Click the Submit button and the breakpoint should be hit – that tells you it’s all connected ok.
Fully working Bootstrap React form example code
Here is the full code for the working form.
import React, { useState } from "react";
import "bootstrap/dist/css/bootstrap.min.css";

import Container from "react-bootstrap/Container";
import Row from "react-bootstrap/Row";
import Col from "react-bootstrap/Col";
import Button from "react-bootstrap/Button";
import Form from "react-bootstrap/Form";
import Alert from "react-bootstrap/Alert";

import "./App.css";

function App() {
  const [showMessage, setShowMessage] = useState(false);
  const [values, setValues] = useState({
    fullname: "",
    email: "",
  });
  const [formerrors, setFormErrors] = useState({});

  //this method handles the each form field changing and updates the relevant
  //state value for that input
  const handleChange = (event) => {
    console.log(
      "handleChange -> " + event.target.name + " : " + event.target.value
    );

    setValues((values) => ({
      ...values,
      [event.target.name]: event.target.value,
    }));
  };

  //this method will check each field in your form. You define
  //the rules for each field
  const validate = () => {
    console.log("Validate the form....");

    let errors = {};

    //name field
    if (!values.fullname) {
      errors.fullname = "Full name is required";
    }

    //email field
    if (!values.email) {
      errors.email = "Email address is required";
    } else if (!/\S+@\S+\.\S+/.test(values.email)) {
      errors.email = "Email address is invalid";
    }

    setFormErrors(errors);

    if (Object.keys(errors).length === 0) {
      return true;
    } else {
      return false;
    }
  };

  const handleSubmit = (event) => {
    if (event) event.preventDefault();

    if (validate(values)) {
      setShowMessage(true);
    } else {
      setShowMessage(false);
    }
  };

  return (
    <div className="App">
      <header className="App-header">
        <p>
          React Bootstrap <code>Form Example</code>.
        </p>
      </header>
      <Container className="p-3">
        <Container>
          <Row>
            <Col>
              <Alert show={showMessage} variant="success">
                <Alert.Heading>Success</Alert.Heading>
                <p>
                  This is an alert, and these can be shown in a variety of
                  styles provided by Bootstrap. Our form submit button simply
                  shows this alert. Another post will go through form validation
                  and errors.
                </p>
                <hr />
                <div className="d-flex justify-content-end">
                  <Button
                    onClick={() => setShowMessage(false)}
                    variant="outline-success"
                  >
                    Close this alert
                  </Button>
                </div>
              </Alert>
            </Col>
          </Row>
          <Row>
            <Col></Col>
            <Col>
              <Form onSubmit={handleSubmit}>
                <Form.Group controlId="formGridName">
                  <Form.Label>Name</Form.Label>
                  <Form.Control
                    placeholder="Full Name"
                    type="text"
                    name="fullname"
                    value={values.fullname}
                    onChange={handleChange}
                  />
                  {formerrors.fullname && (
                    <p className="text-warning">{formerrors.fullname}</p>
                  )}
                </Form.Group>
                <Form.Row>
                  <Form.Group as={Col} controlId="formGridEmail">
                    <Form.Label>Email</Form.Label>
                    <Form.Control
                      placeholder="Enter email"
                      type="email"
                      name="email"
                      value={values.email}
                      onChange={handleChange}
                    />
                    {formerrors.email && (
                      <p className="text-warning">{formerrors.email}</p>
                    )}
                  </Form.Group>
                </Form.Row>

                <Button
                  type="submit"
                  variant="primary"
                  size="lg"
                >
                  Submit
                </Button>
              </Form>
            </Col>
            <Col></Col>
          </Row>
        </Container>
      </Container>
    </div>
  );
}

export default App;
Summary
After reading both of these blog posts you should now have a simple working React Bootstrap form example with validation and error message handling. Be sure to read my post explaining how to use the React developer tools in Chrome to maximize your debugging skills.